Showing posts with label Salt and Pepper. Show all posts

Homemade Marie Rose Seafood Sauce Recipe


Portions: 2


Ingredients

  • 75ml Mayonnaise
  • 20ml Tomato Ketchup
  • A Few Slashes of Worcestershire Sauce
  • 1/4 TSP (1 squeeze) of Lemon Juice

Equipment

  • Mixing Bowl
  • Spoon

Instructions

  1. Add the Mayonnaise and Tomato Ketchup to a bowl and mix well


  2. At the Worcestershire Sauce and give it another mix


  3. Now add the Lemon Juice and give one last good stir!
     

Serving Suggestion(s)

Serve with Prawns or other seafood - personally I love a freshly made Prawn Cocktail!


Ninja Foodi Baked Jacket Pototo Recipe


Portions: 1


Ingredients

  • Large Potato
  • Oil
  • Salt and Pepper
  • Topping(s) - Cheese, Tuna Mayo, Baked Beans, Coleslaw, Curry, Chilli, Beans and Cheese, Butter - the list goes on!

Equipment

  • Ninja Foodi Air Fryer

Instructions

  1. Prick the potato all over with a fork
  2. Cover in oil (I like to use Olive Oil)
  3. Season with Salt and Pepper
  4. Place in the Air Fryer at 200° for 45 minutes - if you're cooking an extra large potato you may need to increase this to 60 minutes, just prick it with a for to see if it feels soft in the center before cutting it open


  5. Remove from the air fryer and place on a plate
  6. Cut open the Jacket Potato


  7. Add some butter


  8. Add whatever other topping(s) you like and enjoy this simple but filling dish!

Serving Suggestion(s)

Serve with lashings of butter and plenty of cheese!  I'm quite partial to a Jacket Potato with Beef Chilli on it too.


Homemade Cauliflower Broccoli Cheese Recipe Quick and Easy


Portions: 1-2


Ingredients

  • 1/2 a Cauliflower (or a mixture of Cauliflower and Broccoli or just Broccoli I guess)!
  • 15g Butter
  • 15g Plain Flour
  • 150ml of Milk
  • 115g of Cheddar Cheese
  • Salt and Pepper


Equipment

  • Saucepan
  • Bowl
  • Spoon
  • Oven Dish

Instructions

  1. Cook the Cauliflower/Broccoli
  2. Drain and put to the side


  3. Melt the butter in a small Saucepan


  4. Stir in the Flour and keep stirring for about a minute


  5. Remove the saucepan from the heat
  6. Slowly stir in the milk and keep stirring as you do so


  7. Don't stop stirring!
  8. Put the saucepan back on the heat (and yes you guessed it) keep stirring it for about a minute to thicken it a bit


  9. The heat needs to be medium to high as we need it to start to boil (keep stirring by the way)
  10. When it does come to the boil, simmer for 1-2 minutes and keep on stirring.


  11. Add 3/4 of the Grated Cheese to the mixture and keep stirring it


  12. Once the cheese has melted in to the sauce (takes just a few moments) remove from the heat
  13. Add Salt and Pepper to taste
  14. Put the already cooked Cauliflower/Broccoli in to a mixing bowl and pour over the cheese sauce
  15. Very gently, using a spoon, ensure all the veg is covered in the delicious sauce
  16. Transfer the Cauliflower/Broccoli in to an oven dish


  17. Sprinkle the remaining cheese on top


  18. Put in the oven at 180 for around 10-15 minutes until the cheese has melted and golden brown on top


  19. Serve and enjoy!

Serving Suggestion(s)

Great on it's own or delicious with a chicken leg!


Asparagus with Hollandaise Sauce


Portions: 1


Ingredients

  • Asparagus
  • 1/2 tbsp White Wine Vinegar
  • 2 Egg Yolks
  • 115g Melted Butter
  • Lemon Juice (1/2 tbsp if 2 Medium Eggs or 1 tbsp if 2 Large Eggs)
  • Salt and Pepper
  • 1 tbsp Cold Water


Equipment

  • Two Saucepans (1 for cooking the Asparagus and a smaller one for the Sauce)
  • Whisk

Instructions

Asparagus

  1. Boil some water in a saucepan


  2. Prepare your Asparagus and when the water has started boiling, drop in the pan and cook for 1-2 minutes until tender
  3. Remove the Asparagus and pour over the Hollandaise Sauce and serve!

Hollandaise Sauce
  1. Add the vinegar to a small pan and bring to a boil


  2. Simmer the vinegar until it has reduced by half
  3. Remove the pan from the heat and add 1 tbsp of cold water
  4. Whisk in the Egg Yolks


  5. Put the pan on to a low heat and continue whisking until the mixture has thickened and has started to become frothy
  6. Remove from the heat and whisk in the Melted Butter
  7. Whisk in the Lemon Juice


  8. Add some Salt and Pepper and give one last swirl of the Whisk
  9. Serve the sauce immediately over the drained Asparagus
It can be a little bit like patting your head whilst rubbing stomach as you need to try and make sure both the Asparagus and the Hollandaise sauce are ready at the same time!

Personally I like to warm a plate in the oven and then boil the water in one pan and the vinegar in another pan, I then set a timer for the Asparagus and continue to make the Hollandaise Sauce and then when the timer goes off I remove the Sauce off of the heat whilst I plate up the Asparagus (on the warmed plate) and cover it with tin foil - I can then continue to make the sauce and pour straight over the Asparagus once it's made!


Serving Suggestion(s)

Best served as a Starter before your Main Meal but you can also serve as a side.


Ninja Foodi Air Fryer Toad in the Hole


Portions: 2-3


Ingredients

  • 175g Plain Flour
  • 1/2 tbsp Chives
  • 2 eggs
  • 300ml Milk
  • 50g Lard or Beef Dripping
  • 1/2 Dozen Pork Sausages
  • Salt and Pepper

Equipment

  • Mixing Bowl
  • Tea Towel
  • Whisk
  • Ninja Foodi Air Fryer
  • Tin Foil

Instructions

  1. Put the Plain Flour in to a mixing bowl
  2. Whisk the Eggs and slowly Whisk them in to the flour


  3. Slowly add the Milk and continually whisk the mixture until all the milk has been added and the batter is nice and smooth


  4. Add the chives and give it one last whisk


  5. Place a Tea Towel over the bowl and leave to one side for at least 30 minutes


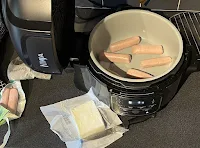
  6. Put around 10g of the Lard or Beef Dripping in to the air fryer (along with the 6 sausages) and Air Fry at 160° for 14 minutes (turning the sausages half-way)


  7. Remove the Sausages from the Ninja Foodi Air Fryer and wrap in Tin Foil to keep warm.
  8. Add the remaining Lard/Beef Dripping to the Ninja Foodi Air Fryer and Air Fry at 210° for 5-10 minutes until it is piping hot


  9. Carefully add back the Sausages


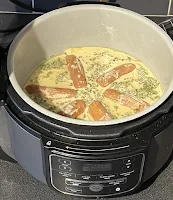
  10. Carefully pour in the Batter mix (rearrange the sausages as necessary as they can move around a bit when you pour the batter in)!


  11. Cook on 210° for 15-20 minutes until the Yorkshire has risen and crisped up to your liking!


Serving Suggestion(s)

It can definitely be enjoyed on its own...


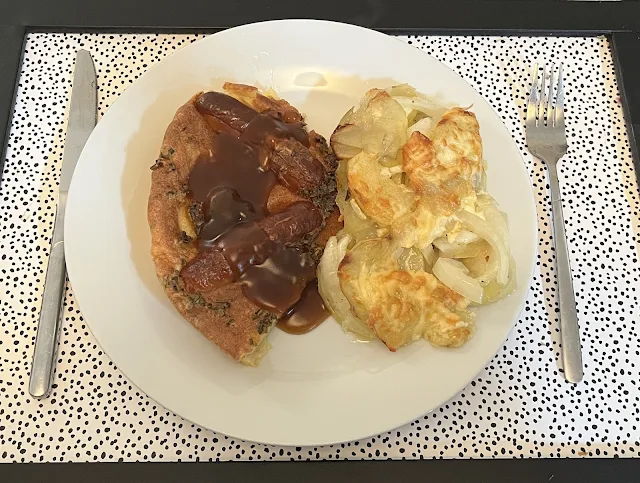
...but in my opinion it is best served with some gravy!


Toad in the hole can also be enjoyed with Mashed Potatoes, Pan Haggerty or even some lovely Roast Potatoes!


Homemade (Traditional) Pan Haggerty Recipe


Portions: 2


Ingredients

  • 2 medium sized potatoes (very thinly slices)
  • 1 large onion (also very thinly sliced)
  • Cheddar Cheese (as little or as much as you like)
  • Small amount of butter (melted)
  • Salt and Pepper to taste

Equipment

  • Chopping Board
  • Knife
  • Grater
  • Oven Dish

Instructions

  1. Prepare your Potatoes and Onion by thinly slicing them


  2. Melt your butter and drizzle a little in to the bottom of the oven dish and smear up the sides to prevent anything from sticking during the cooking process


  3. Place a layer of potato in to the oven dish and then a layer of the onions


  4. Drizzle a small amount of the Melted Butter over the top of the onions and add a little Salt and Pepper


  5. Repeat Steps 3 and 4 until you reach the top of your Oven Dish but ensure you always finish with a layer of Potatoes!


  6. Grate some cheese on top


  7. Cover in Tin Foil


  8. Bake in the over at 180° for 40 minutes
  9. Remove from the oven, take off the Tin Foil (add a little more cheese if you like)


  10. Put back in the oven at 180° for 10 minutes (or until the cheese has melted to your liking!


  11. Serve and enjoy - be careful of tucking in to it as soon as you remove it from the oven as cheese can be molten hot when baked in the oven and I wouldn't want you to burn your mouth!


    This photo doesn't do it justice, but the bubbles in the top corner show just how hot it can be when you first take it out of the oven.

Serving Suggestion(s)

Eat on it's own as an indulgent treat or serve as a side to a main meal such as homemade Toad in the Hole!